Auto-Fibonacci tools have a dirty secret: they draw the retracement grid on whatever the latest swing happens to be, with no opinion about whether that swing mattered — and the grid jumps every time the swing redraws. Impulse Waves & Reversal Zones, a free open-source TradingView indicator by [MQLSoftware], takes the opposite route: classify the structure first, project a zone only from legs that qualify, and track that zone until it resolves — targets, stop, and a live status that retires a played-out setup instead of leaving it on the chart looking like an opportunity.
Not every leg deserves a zone
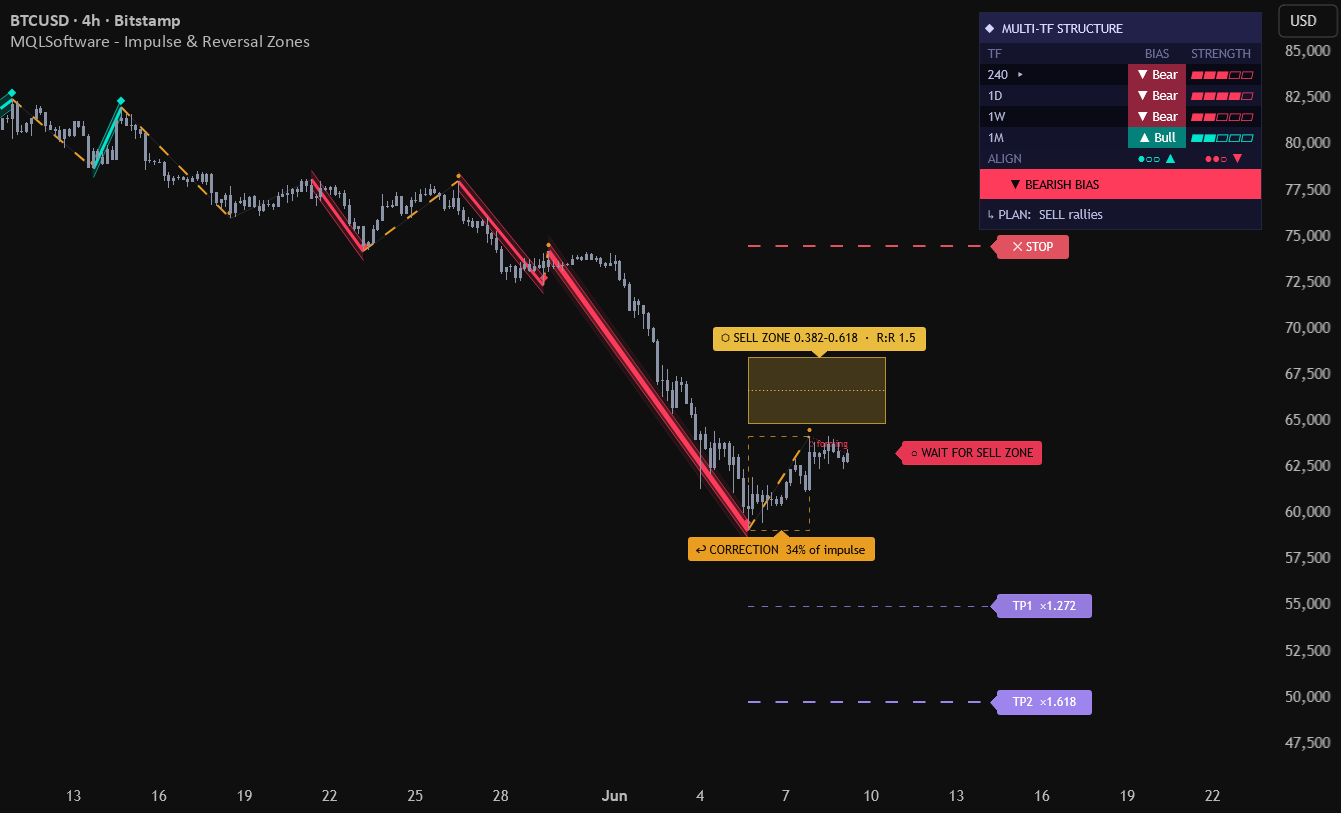
Every swing leg gets scored 0–100 before anything is drawn from it: one half Efficiency Ratio (net move divided by path traveled — how straight the leg is), one half Displacement Percentile (the leg’s size in ATR units, ranked against the recent distribution of legs on this chart). Only with-trend legs that clear the threshold are drawn as bold impulse channels; everything else stays a faint wave skeleton. Because the size half is a percentile against recent legs rather than a fixed pip value, the filter self-calibrates across instruments and timeframes — no magic numbers to tune.
Protected swings: why the trend doesn’t flip on every pullback
Trend direction runs on a change-of-character state machine with protected swings: the trend only flips when price breaks the swing that launched the prior impulse. Shallow pullbacks stay classified as corrections — which kills the classic failure mode of naive zigzag tools, where the “trend” flips every few bars and drags the retracement grid with it.
A zone with a lifecycle
The reversal zone spans the 0.382–0.618 retracement of the qualified impulse, with TP1 (×1.272) and TP2 (×1.618) extensions and a stop beyond the impulse origin, labelled with the resulting R:R. The active correction is framed as an amber box labelled with its retracement depth — and an overrun beyond 100% is relabelled a deep retrace, because the structure the zone relied on is now at risk, and pretending otherwise would be lying to you.
The status chip moves through waiting → in-zone → target hit / stopped. Resolutions are latched: once a setup is stopped or completes, the zone greys out and cannot revive itself if price wanders back. Played-out setups are visually retired — the chart shows you what’s live, not what used to be.
The panel that won’t contradict itself
The right-side panel reads the chart plus automatically selected higher timeframes (a 1H chart reads 4H / 1D / 1W): per-row bias with an ADX-based conviction bar, an ALIGN score, a verdict, and a plain-language plan line. Two honest details worth noting. The chart’s own row is marked pullback when its direction opposes the trading bias — so a green chart row inside a bearish plan reads as the rally you’re selling, not a long signal. And when the bias is backed only by ranging higher timeframes, the plan softens to “low conviction” and flags the active setup the same way — the panel never states two opposite things at once.
FAQ
Is it free?
Yes — free and open-source on TradingView. No paywall on the indicator.
Does it repaint?
Committed impulses and corrections are built from confirmed pivots and stay anchored; the forming leg is explicitly labelled “forming”. Setup resolutions are latched. Higher-timeframe panel data uses lookahead_off with a one-bar offset — the canonical non-repainting pattern. One inherent property of all pivot-based tools applies: a pivot becomes visible only after the right-bars delay (default 3 closed bars).
Are the alerts confirmed-bar?
Yes — all alerts are gated by barstate.isconfirmed and fire once per closed bar.
Where’s the full guide?
Every input, the alert setup and worked chart examples are in the MQLSoftware account area — free with registration. Related tools from the same line: the pullback-outcome oscillator and the session sweep counter.
Download for MetaTrader 4 and 5
Download free MT4 + MT5 ZIP — no registration
Includes compiled indicators, installation instructions and available templates for Windows desktop MetaTrader. Extract the archive and follow INSTALL.txt. Enable DLL imports only for the trusted MQLSoftware indicator: it uses the Windows internet library for activation. No separate DLL is included.
Fresh builds are generated daily. This build: 5 October 2026 01:00 UTC; valid until 5 November 2026 01:00 UTC (31 days from build time). Downloading or sharing an older archive does not restart its term. Online activation and periodic checks are required. You may share or mirror the original ZIP unchanged, including its instructions. Return to this page for current builds.
ZIP size: 207720 bytes. SHA-256: Verify your download
2a62b0a6d6110d3bf452bf7d58b7594cdb14ee59f7dc3511f428185afddfdd86
TradingView video walkthrough
This Indicator Only Draws a Reversal Zone When the Move Earns It — Free on TradingView
Watch on YouTube. This video shows TradingView; installation in MetaTrader follows the ZIP instructions.